Im looking for information on
"muddy" photos and how Not
to make them or process to
remove.
Thanks in advance.
Board index ‹ Photography ‹ Technical Questions ‹ "Muddy" photos.
Technical Questions
"Muddy" photos.
7 posts • Page 1 of 1
- Posts: 282
![]() Sun Aug 19, 2007 4:20 pm
Sun Aug 19, 2007 4:20 pm
define "muddy" or better still if you can link to an image you have that fit's this description...
I'm going to guess though your talking about soft, low contrast images with colours that don't "pop".
obviously first thing is the actual capture.
Assuming your lenses are good the focus is correct is to check that you're not underexposing your images you want to get the most dynamic range you can out of your sensor so if you underexpose (deliberately to avoid blown out highlights or inadvertently because of bright backgrounds/sky) then try pushing the exposure up even to the point where you get just a touch of clipping in the histogram.
Also consider using fill flash to bring up the brightness of subjects (say portraits) when shooting against bright backgrounds or sky.
Obviously some shots, no matter how much you try will still come out of the camera dull.
Post production is your friend here and the two keys are both called Unsharp Mask (which despite the name is actually a sharpening process)
one of the first things I do after basic exposure correction in RAW conversion (or the first thing with a straight from camera JPG) is do "Local Contrast Enhancement" using unsharp mask in Photoshop - for this you set the sharpening figure quite low but the radius quite high (you'll need to figure those settings out for your self as they vary with images and also are highly dependent on the resolution/image size (smaller images need less sharpening and lower radius larger ones need more)
I'm unfamiliar with editing programs other than Photoshop but most half decent ones should have unsharp mask as it's an essential process thats been around since the early days of chemical darkroom and is a standard trick of the trade.
usually this will make the separate parts of your picture stand out, colours pop and every thing seems more distinct, don't get carried away with it and keep it on the side of subtle as it looks startlingly good at first but as you do loose some detail in the shadow and bright areas and over doing it is a bit of a cliche.
after that you can do any other adjustments
then the last thing is to do the final sharpening using much higher sharpness setting and low radius setting (possibly using an edge mask) that will improve edge definition... again err on the side of subtlety over sharpened images can take on a look of fakery and induce haloing around objects.
there is no .sig
- Posts: 168
muddy
![]() Mon Aug 20, 2007 9:51 am
Mon Aug 20, 2007 9:51 am
Marx
Thanks for your reply. I will try the un-sharpen filter as you
explained and see how that works.
What im trying to describe are photos that dont have that
fine line detail. When hair strands look like Ropes rathater than Threads.
Again, thanks for your response.
Thanks for your reply. I will try the un-sharpen filter as you
explained and see how that works.
What im trying to describe are photos that dont have that
fine line detail. When hair strands look like Ropes rathater than Threads.
Again, thanks for your response.
- Posts: 2276
![]() Mon Aug 20, 2007 10:04 am
Mon Aug 20, 2007 10:04 am
Henry, as marxz suggested it would be good to post an image or two, or links. There can be a number of factors that effect image quality, and some examples would help.

- Posts: 282
![]() Mon Aug 20, 2007 4:14 pm
Mon Aug 20, 2007 4:14 pm
OK now I wouldn't call that "muddy" but I can see what you mean about the hear it's a bit "flat" and lacking in detail....
I'm no professional so you can take what I say with a pinch of salt but having gone through your galleries first thing is - there's some great shots there so your doing a heck of a lot of things right ... even in the shots of this woman from the same shoot there are quite few that have good degree of detail in the hair.
now first I'm guessing in this shot she's in shadows so there's not a lot of light producing highlights and showing hair detail. the predominant light source seems to be from almost the large amount of ambiant light bleeding though directly behind (and a little high but not high enough to catch the hair)
There's no exif data with this so I can't see if you used flash... it kind of looks like there's a bit of on camera flash either that or there's a light source or a lot of ambient light reflecting front and slightly high (going from face and glasses highlights)
in addition theirs a lot of light reflecting off the grass causing 1: the whole detail of the model to be flattened and 2: casting a strong yellow cast to her legs and forearms and throwing a fair amount of light up under her face and to the hair around the neck (were you expect it to be darker)
what I'd do lighting wise is try using a large reflector or a slave flash witha big soft box to light one side of the face bit more and add some highlights or have the same aimed high to skim the hair.
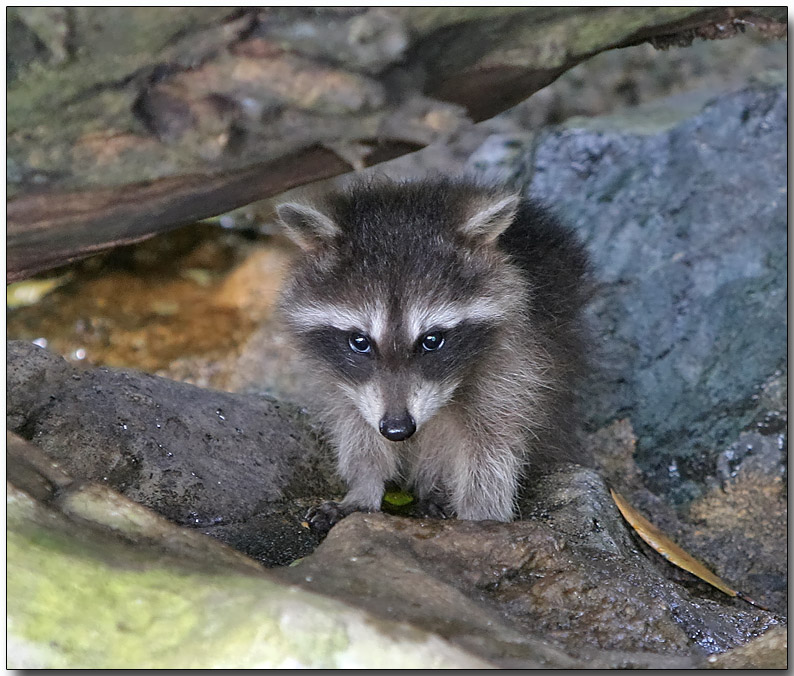
also her hair's pretty "flat" unlike the other example of the raccoon (sorry I assume it's a raccoon... I can tell almost a dozen kangaroo and wallaby species apart but northern hemisphere animals are all alien looking things to me) now notice the hair is pretty wild and has a lot of contrast... no woman would probably want to look quite so extreme as that in real life but using temporary colour highlights and some teasing and holding hair "product" could allow the hair to catch more highlights and seem less flat.
post production you could probably mask of everything else and use burn and dodge tools to increase hair contrast and also apply slightly heavier sharpening to it....
also I'd probably mask the background and do a little bit of curves and/or local contrast enhancements..
I hope you don't mind as this is both quick and dirty and also a little over the top processing (it's after midnight here and I'm Zzzzzzz..... a little off the ball) but... you get the idea....

1 set mask to select only the hair, use dodge to add increase existing highlights and mid tones (don't try to add non existent highlights - they just look fake)
2 using the same mask do a unsharp mask local contrast enhancements (in the case of this small image about 10 strength with 40 radius)
3 again using the same mask then do a normal unsharp mask with bout 30 strength and about .8 radius (normally you'd do after the next step)
4 use the mask to make an adjustments layer (curves bring the shadows down slightly and slightly increase the mids and highlights so you get a nice S curve shape that balances the lifting of the highlights some more and darkening the hair in the shadows around the neck
5 select the body (without the hair) and mask off the rest of the image
6 do the local contrast enhancement roughly the same strength but slightly higher radius
7 use fade filter to set the filter effect to overlay and pull the fade filter down way way low - like 10 or 15% - don't worry too much about darkening the underside of the legs or arms just yet as the next step will do that
8 using the same mask create a adjustment layer hue/saturation.
boost the total saturation just a touch (about 10 to 14) now go to yellow and pull down it's saturation a fair bit (between 20 and 30) and it's lightness down about the same until the underside of the legs and arms start to slide in to a slight shadows. now slide the yellow's "hue" slider slightly to the left to bring some warmer tones back in to that area (I've over done this step by way too far in this example bringing too much blue (see under sunglasses - and everywhere else).
you can do the above a number of ways to achieve the same result (in fact most of the effects here I'd probably lift (copy past) the individual elements (hair, body) in to their own layers and apply the adjustments just to their own layers
I'm no professional so you can take what I say with a pinch of salt but having gone through your galleries first thing is - there's some great shots there so your doing a heck of a lot of things right ... even in the shots of this woman from the same shoot there are quite few that have good degree of detail in the hair.
now first I'm guessing in this shot she's in shadows so there's not a lot of light producing highlights and showing hair detail. the predominant light source seems to be from almost the large amount of ambiant light bleeding though directly behind (and a little high but not high enough to catch the hair)
There's no exif data with this so I can't see if you used flash... it kind of looks like there's a bit of on camera flash either that or there's a light source or a lot of ambient light reflecting front and slightly high (going from face and glasses highlights)
in addition theirs a lot of light reflecting off the grass causing 1: the whole detail of the model to be flattened and 2: casting a strong yellow cast to her legs and forearms and throwing a fair amount of light up under her face and to the hair around the neck (were you expect it to be darker)
what I'd do lighting wise is try using a large reflector or a slave flash witha big soft box to light one side of the face bit more and add some highlights or have the same aimed high to skim the hair.
also her hair's pretty "flat" unlike the other example of the raccoon (sorry I assume it's a raccoon... I can tell almost a dozen kangaroo and wallaby species apart but northern hemisphere animals are all alien looking things to me) now notice the hair is pretty wild and has a lot of contrast... no woman would probably want to look quite so extreme as that in real life but using temporary colour highlights and some teasing and holding hair "product" could allow the hair to catch more highlights and seem less flat.
post production you could probably mask of everything else and use burn and dodge tools to increase hair contrast and also apply slightly heavier sharpening to it....
also I'd probably mask the background and do a little bit of curves and/or local contrast enhancements..
I hope you don't mind as this is both quick and dirty and also a little over the top processing (it's after midnight here and I'm Zzzzzzz..... a little off the ball) but... you get the idea....
1 set mask to select only the hair, use dodge to add increase existing highlights and mid tones (don't try to add non existent highlights - they just look fake)
2 using the same mask do a unsharp mask local contrast enhancements (in the case of this small image about 10 strength with 40 radius)
3 again using the same mask then do a normal unsharp mask with bout 30 strength and about .8 radius (normally you'd do after the next step)
4 use the mask to make an adjustments layer (curves bring the shadows down slightly and slightly increase the mids and highlights so you get a nice S curve shape that balances the lifting of the highlights some more and darkening the hair in the shadows around the neck
5 select the body (without the hair) and mask off the rest of the image
6 do the local contrast enhancement roughly the same strength but slightly higher radius
7 use fade filter to set the filter effect to overlay and pull the fade filter down way way low - like 10 or 15% - don't worry too much about darkening the underside of the legs or arms just yet as the next step will do that
8 using the same mask create a adjustment layer hue/saturation.
boost the total saturation just a touch (about 10 to 14) now go to yellow and pull down it's saturation a fair bit (between 20 and 30) and it's lightness down about the same until the underside of the legs and arms start to slide in to a slight shadows. now slide the yellow's "hue" slider slightly to the left to bring some warmer tones back in to that area (I've over done this step by way too far in this example bringing too much blue (see under sunglasses - and everywhere else).
you can do the above a number of ways to achieve the same result (in fact most of the effects here I'd probably lift (copy past) the individual elements (hair, body) in to their own layers and apply the adjustments just to their own layers
there is no .sig
- Posts: 168
![]() Tue Aug 21, 2007 11:19 am
Tue Aug 21, 2007 11:19 am
Marxz
Thanks for all your help here. I appreciate your detailed explanation and time to write that all down.
I pretty much get it now and will apply to my work.
That work you did really changed the look of the photo. Excellent.
Thanks again.
Good thing you can differenciate roos and wallabys cuz I swear they're
same animal..lol
Henry
7 posts • Page 1 of 1
Board index ‹ Photography ‹ Technical Questions ‹ "Muddy" photos.
Who is online
Users browsing this forum: ClaudeBot and 1 guest